FRP Asteroids
45 min read
Introduction
FunctionalFunctional languages are built around the concept of composable functions. Such languages support higher-order functions which can take other functions as arguments or return new functions as their result, following the rules of the Lambda Calculus. Reactive Programming (specifically the ObservableA data structure that represents a collection of future values or events, allowing for asynchronous data handling and reactive programming. /Observer pattern) allows us to capture asynchronousOperations that occur independently of the main program flow, allowing the program to continue executing while waiting for the operation to complete. actions like user interfaceA TypeScript construct that defines the shape of an object, specifying the types of its properties and methods. events in streams. These allow us to “linearise” the flow of control, avoid deeply nested loops, and process the stream with pure, referentially transparent functions.
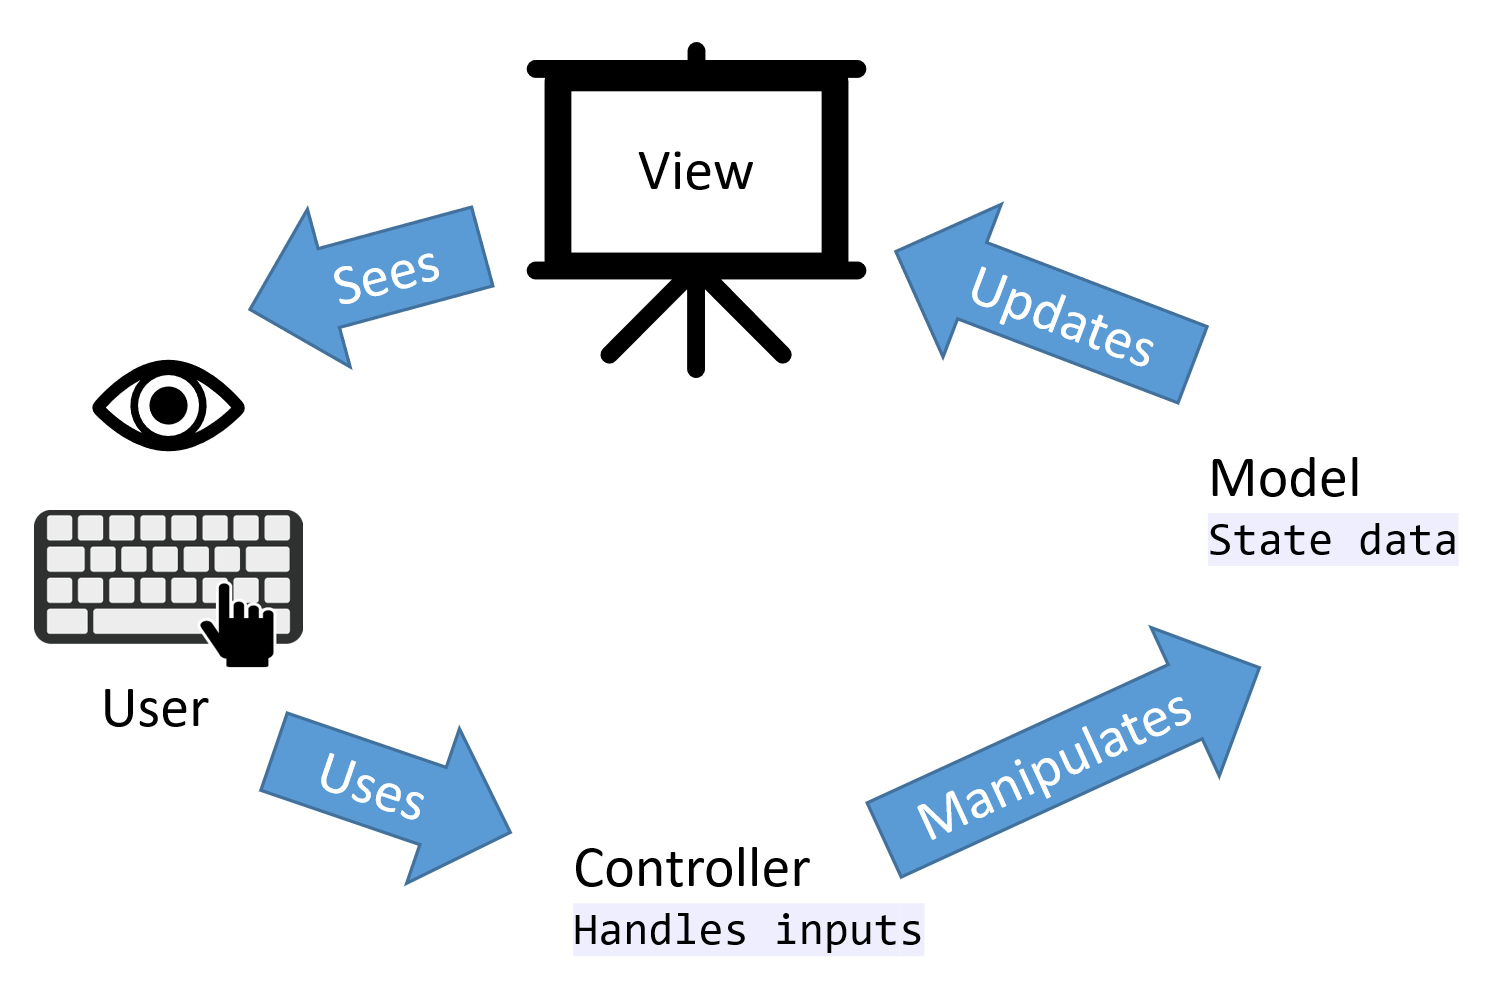
As an example we will build a little “Asteroids” game using FRP. We’re going to use RxJS as our ObservableA data structure that represents a collection of future values or events, allowing for asynchronous data handling and reactive programming. implementation, and we are going to render it in HTMLHyper-Text Markup Language - the declarative language for specifying web page content. using SVGScalable Vector Graphics - another part of the HTML standard for specifying images declaratively as sets of shapes and paths. . We’re also going to take some pains to make pure functionalFunctional languages are built around the concept of composable functions. Such languages support higher-order functions which can take other functions as arguments or return new functions as their result, following the rules of the Lambda Calculus. code (and lots of beautiful curried lambda (arrow) functions). We’ll use TypeScript type annotationsA syntax in TypeScript where types are explicitly specified for variables, function parameters, and return types to ensure type safety and correctness. to help us ensure that our data is indeed immutable and to guide us in plugging everything together without type errors into a nicely decoupled Model-View-Controller (MVC) architecture:
If you’re the kind of person who likes to work backwards, you can jump straight to playing the final result and you can also live edit its code.
We’ll build it up in several steps.
-
First, we’ll just rotate the ship
- Then, we’ll eliminate global mutable state using “Pure” ObservableA data structure that represents a collection of future values or events, allowing for asynchronous data handling and reactive programming. Streams
- Then, we’ll add physics and handle more inputs
- We’ll isolate the view
- Next, we’ll introduce other objects, starting with bullets
- Finally, we’ll deal with collisions
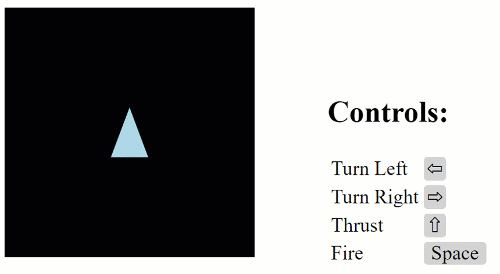
Let’s start by making the SVGScalable Vector Graphics - another part of the HTML standard for specifying images declaratively as sets of shapes and paths. with a simple polygon for the ship. It will look like this:
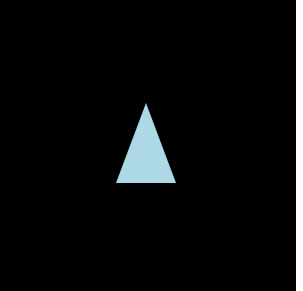
And here’s the snippet of HTMLHyper-Text Markup Language - the declarative language for specifying web page content. that creates the ship:
<svg width="150" height="150" style="background-color:black">
  <g id="ship" transform="translate(75,75)">
    <polygon points="-15,20 15,20 0,-20"
                style="fill:lightblue">
    </polygon>
  </g>
</svg>
Note that the ship is rendered inside a transform group <g>. We will be changing the transform attribute to move the ship around.
Rotating the ship
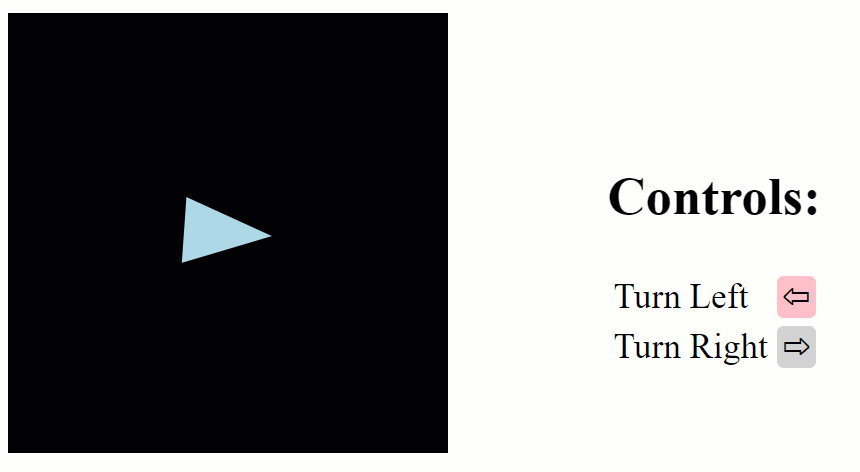
To begin with, we’ll make it possible for the player to rotate the ship with the arrow keys. First, by directly adding listeners to keyboard events. Then, by using events via ObservableA data structure that represents a collection of future values or events, allowing for asynchronous data handling and reactive programming. streams. Here’s a preview of what it’s going to look like (or you can play with it in a live editor):
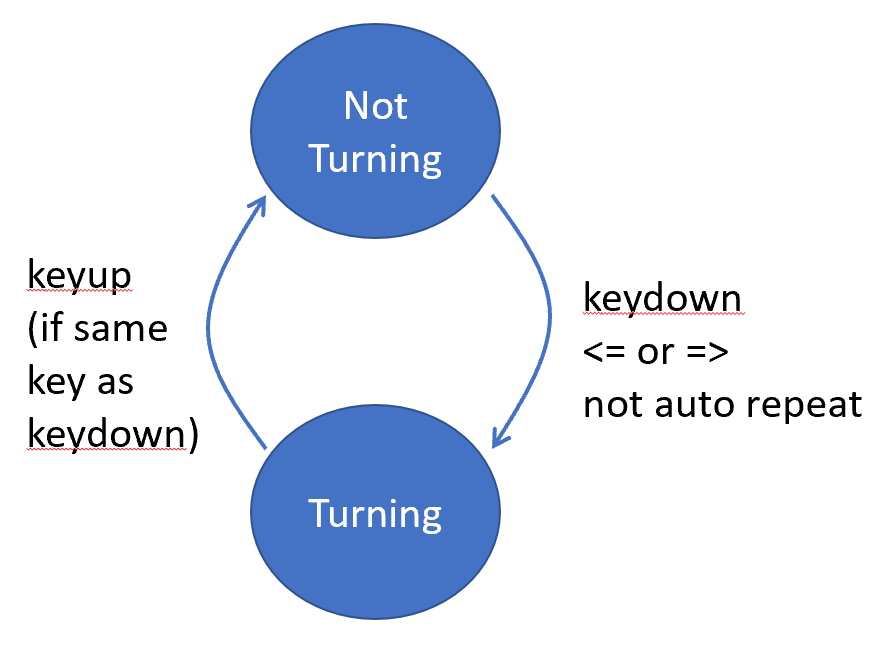
There are basically just two states, as sketched in the following state machine:
Using Events Directly
The first event we assign a function to is the window load event. This function will not be invoked until the page is fully loaded, and therefore the SVGScalable Vector Graphics - another part of the HTML standard for specifying images declaratively as sets of shapes and paths. objects will be available. Thus, our code begins:
window.onload = function() {
  const ship = document.getElementById("ship")!;
  ...
ship will reference the SVGScalable Vector Graphics - another part of the HTML standard for specifying images declaratively as sets of shapes and paths.
<g> whose transform attribute we will be manipulating to move it. To apply an incremental movement, such as rotating the ship by a certain angle relative to its current orientation, we will need to store that current location. We could read it out of the transform attribute stored in the SVGScalable Vector Graphics - another part of the HTML standard for specifying images declaratively as sets of shapes and paths.
, but that requires some messy string parsing. We’ll just store the state in a local object, which we will keep up to date as we move the ship. For now, all we have is the ship’s position (x and y coordinates) and rotation angle:
...
  const state = {
      x:100, y:100, angle:0
  }
...
Next, we need to specify a function to be invoked on keydown events:
...
  document.onkeydown = function(d:KeyboardEvent) {
...
Inside this function, we are only interested in left and right arrow keys. If the keys are held down, after a moment they may start repeating automatically (this is OS dependent) and will churn out continuous keydown events. We filter these out too by inspecting the KeyboardEvent.repeat property:
...
    if((d.key === "ArrowLeft" || d.key === "ArrowRight") && !d.repeat) {
...
Let’s say we want a left- or right-arrow keydown event to start the ship rotating, and we want to keep rotating until the key is released. To achieve this, we use the built-in setInterval(f,i) function, which invokes the function f repeatedly with the specified interval i delay (in milliseconds) between each invocation. setInterval returns a numeric handle which we need to store so that we can clear the interval behaviour later.
      const handle = setInterval(function() {
        ship.setAttribute('transform',
          `translate(${state.x},${state.y}) rotate(${state.angle+=d.key === "ArrowLeft" ? -1 : 1})`)
        }, 10);
So as promised, this function is setting the transform property on the ship, using the position and angle information stored in our local state object. We compute the new position by deducting or removing 1 (degree) from the angle (for a left or right rotation respectively) and simultaneously update the state object with the new angle.
Since we specify 10-millisecond delay, the ship will rotate 100 degrees per second.
We’re not done yet. We have to stop the rotation on keyup by calling clearInterval, for the specific interval we just created on keydown (using the handle we stored). To do this, we’ll use document.addEventListener to specify a separate keyup handler for each keydown event, and since we will be creating a new keyup listener for each keydown event, we will also have to cleanup after ourselves or we’ll have a memory (event) leak:
...
      const keyupListener = function(u:KeyboardEvent) {
        if(u.key === d.key) {
          clearInterval(handle);
          document.removeEventListener('keyup',keyupListener);
        }
      };
      document.addEventListener("keyup",keyupListener);
    }
  }
}
And finally we’re done. But it was surprisingly messy for what should be a relatively straightforward and commonplace interaction. Furthermore, the imperativeImperative programs are a sequence of statements that change a program’s state. This is probably the dominant paradigm for programming languages today. Languages from Assembly to Python are built around this concept and most modern languages still allow you to program in this style.
style code above finished up deeply nested with function declarations inside function declarations, inside ifs and variables like d, handle and keyupListener are referenced from inside these nested function scopes in ways that are difficult to read and make sense of. The state machine is relatively straightforward, but it’s tangled up by imperativeImperative programs are a sequence of statements that change a program’s state. This is probably the dominant paradigm for programming languages today. Languages from Assembly to Python are built around this concept and most modern languages still allow you to program in this style.
code blocks.
Using Observable
ObservableA data structure that represents a collection of future values or events, allowing for asynchronous data handling and reactive programming.
(we’ll use the implementation from RxJS) wraps common asynchronousOperations that occur independently of the main program flow, allowing the program to continue executing while waiting for the operation to complete.
actions like user events and intervals in streams, that we can process with a chain of “operators” applied to the chain through a pipe.
We start more or less the same as before, inside a function applied on window.onload, and we still need local variables for the ship visual and its position/angle:
window.onload = function() {
  const
    ship = document.getElementById("ship")!,
    state = { x:100, y:100, angle:0 };
...
But now we use the RxJS fromEvent function to create an ObservableA data structure that represents a collection of future values or events, allowing for asynchronous data handling and reactive programming.
keydown$ (the “$” is a convention indicating the variable is a stream),
const keydown$ = fromEvent<KeyboardEvent>(document, 'keydown');
The objects coming through the stream are of type KeyboardEvent, meaning they have the key and repeat properties we used before. We can create a new stream that filters these out:
  const arrowKeys$ = keydown$.pipe(
    filter(({key})=>key === 'ArrowLeft' || key === 'ArrowRight'),
    filter(({repeat})=>!repeat));
To duplicate the behaviour of our event-driven version we need to rotate every 10ms. We can make a stream that fires every 10ms using interval(10), which we can “graft” onto our arrowKeys$ stream using mergeMap. We use takeUntil to terminate the interval on a 'keyup', filtered to ignore keys other than the one that initiated the 'keydown'. At the end of the mergeMap pipe we use map to return d, the original keydown KeyboardEvent object. Back at the top-level pipe on arrowKeys$ we inspect this KeyboardEvent object to see whether we need a left or right rotation (positive or negative angle). Thus, angle$ is just a stream of -1 and 1.
  const angle$ = arrowKeys$.pipe(
    mergeMap(d=>interval(10).pipe(
      takeUntil(fromEvent<KeyboardEvent>(document, 'keyup').pipe(
        filter(({key})=>key === d.key)
      )),
      map(_=>d))
    ),
    map(d=>d.key==='ArrowLeft'?-1:1));
Finally, we subscribe to the angle$ stream to perform our effectful code, updating state and rotating ship.
  angle$.subscribe(a=>
      ship.setAttribute('transform',
       `translate(${state.x},${state.y}) rotate(${state.angle+=a})`)
  )
}
Arguably, the ObservableA data structure that represents a collection of future values or events, allowing for asynchronous data handling and reactive programming. code has many advantages over the event handling code:
- The streams created by
fromEventandintervalautomatically clean up the underlying events and interval handles when the streams complete. - The “stream” abstraction provided by observableA data structure that represents a collection of future values or events, allowing for asynchronous data handling and reactive programming.
gives us an intuitive way to think about asynchronousOperations that occur independently of the main program flow, allowing the program to continue executing while waiting for the operation to complete.
behaviour and chain transformations of the stream together through
pipes. - We didn’t see it so much here, but the various observableA data structure that represents a collection of future values or events, allowing for asynchronous data handling and reactive programming.
streams we created are composable, in the sense that adding new pipes (or potentially multiple
subscribes) to them allows us to reuse and plug them together in powerful ways.
Pure Observable Streams
A weakness of the above implementation using ObservableA data structure that represents a collection of future values or events, allowing for asynchronous data handling and reactive programming.
streams is that we still have global mutable state. Deep in the function passed to subscribe, we alter the angle attribute on the state object. Another ObservableA data structure that represents a collection of future values or events, allowing for asynchronous data handling and reactive programming.
operator scan allows us to capture this state transformation inside the stream, using a pure functionA function that always produces the same output for the same input and has no side effects.
to transform the state, i.e. a function that takes an input state object and—rather than altering it in-place—creates a new output state object with whatever change is required.
We’ll start by altering the start of our code to define an interface for State with readonly members, and we’ll place our initialState in a const variable that matches this interfaceA TypeScript construct that defines the shape of an object, specifying the types of its properties and methods.
. You can also play with the code in a live editor.
window.onload = function() {
  type State = Readonly<{
    x: number;
    y: number;
    angle: number;
  }>
  const initialState: State = { x: 100, y: 100, angle: 0};
Now we’ll create a function that is a pure transformation of State:
...
  function rotate(s:State, angleDelta:number): State {
    return { ...s, // copies the members of the input state for all but:
      angle: s.angle + angleDelta  // only the angle is different in the new State
    }
  }
...
Next, we have another, completely self-contained function to update the SVGScalable Vector Graphics - another part of the HTML standard for specifying images declaratively as sets of shapes and paths. for a given state:
...
  function updateView(state:State): void {
    const ship = document.getElementById("ship")!;
    ship.setAttribute('transform',
     `translate(${state.x},${state.y}) rotate(${state.angle})`)
  }
...
And now our main pipe (collapsed into one) ends with a scan which “transduces” (transforms and reduces) our state, and the subscribe is a trivial call to updateView:
...
  fromEvent<KeyboardEvent>(document, 'keydown')
    .pipe(
      filter(({code})=>code === 'ArrowLeft' || code === 'ArrowRight'),
      filter(({repeat})=>!repeat),
      mergeMap(d=>interval(10).pipe(
        takeUntil(fromEvent<KeyboardEvent>(document, 'keyup').pipe(
          filter(({code})=>code === d.code)
        )),
        map(_=>d))
      ),
      map(({code})=>code==='ArrowLeft'?-1:1),
      scan(rotate, initialState))
    .subscribe(updateView)
}
The code above is a bit longer than what we started with, but it’s starting to lay a more extensible framework for a more complete game. And it has some nice architectural properties, in particular we’ve completely decoupled our view code from our state management. We could swap out SVGScalable Vector Graphics - another part of the HTML standard for specifying images declaratively as sets of shapes and paths.
for a completely different UI by replacing the updateView function.
Adding Physics and Handling More Inputs
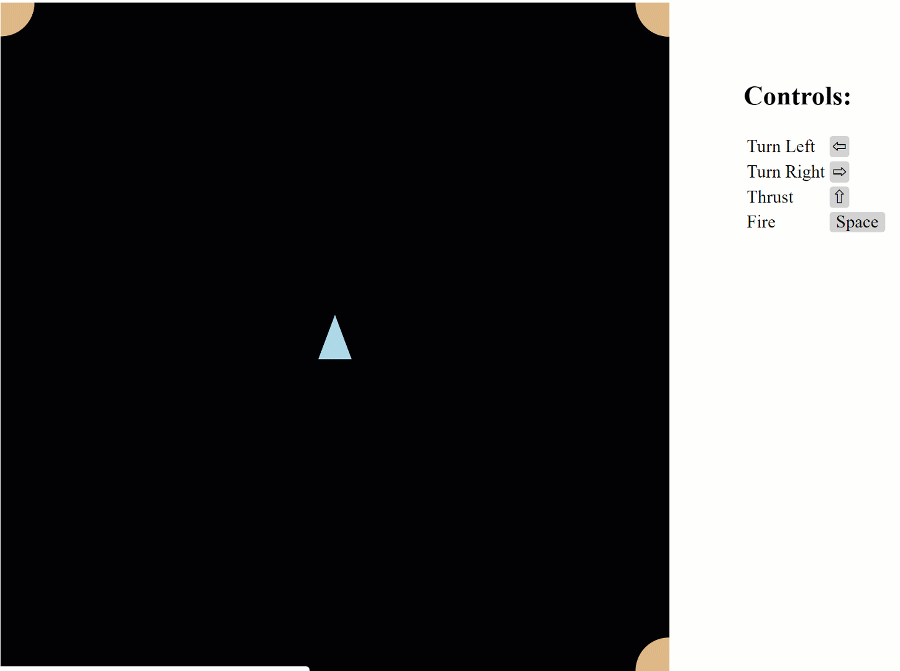
Classic Asteroids is more of a space flight simulator in a weird toroidal topology than the “static” rotation that we’ve provided above. We will make our spaceship a freely floating body in space, with directional and rotational velocity. We are going to need more inputs than just left and right arrow keys to pilot our ship too.
Here’s a sneak preview of what this next stage will look like (click on the image to try it out in a live code editor):

Input Actions
Let’s start with adding “thrust” in response to up arrow.
With the code above, adding more and more intervals triggered by key down events would get increasingly messy.
Rather than have streams triggered by key events, for the purposes of simulation it makes sense that our main ObservableA data structure that represents a collection of future values or events, allowing for asynchronous data handling and reactive programming.
be a stream of discrete timesteps. Thus, we’ll be moving our interval(10) to the top of our pipe.
Before, we had just left and right rotations coming out of our stream. Our new stream is going to have multiple types of actions as payload:
Tick- a discrete timestep in our simulation, triggered byinterval.Rotate- a ship rotation triggered by left or right arrows keysThrust- fire the boosters! Using the up-arrow key
We’ll create separate ObservablesA data structure that represents a collection of future values or events, allowing for asynchronous data handling and reactive programming. for each of the key events. There’s a repetitive pattern in creating each of these ObservablesA data structure that represents a collection of future values or events, allowing for asynchronous data handling and reactive programming. , for a given:
Event- keydown or keyupKey- one of the arrows (for now)- produce an ObservableA data structure that represents a collection of future values or events, allowing for asynchronous data handling and reactive programming. stream of a particular action type.
It sounds like something we can model with a nice reusable function:
  type Event = 'keydown' | 'keyup'
  type Key = 'ArrowLeft' | 'ArrowRight' | 'ArrowUp'
  const observeKey = <T>(eventName:Event, k:Key, result:()=>T)=>
    fromEvent<KeyboardEvent>(document,eventName)
      .pipe(
        filter(({code})=>code === k),
        filter(({repeat})=>!repeat),
        map(result)),
Now we have all the pieces to create a whole slew of input streams (the definitions for Rotate and Thrust classes are below):
  const
    startLeftRotate = observeKey('keydown','ArrowLeft',()=>new Rotate(-.1)),
    startRightRotate = observeKey('keydown','ArrowRight',()=>new Rotate(.1)),
    stopLeftRotate = observeKey('keyup','ArrowLeft',()=>new Rotate(0)),
    stopRightRotate = observeKey('keyup','ArrowRight',()=>new Rotate(0)),
    startThrust = observeKey('keydown','ArrowUp', ()=>new Thrust(true)),
    stopThrust = observeKey('keyup','ArrowUp', ()=>new Thrust(false))
Vector Maths
Since we’re going to start worrying about the physics of our simulation, we’re going to need some helper code. First, a handy dandy Vector class. It’s just standard vector maths, so hopefully self-explanatory. In the spirit of being pure and declarativeDeclarative languages focus on declaring what a procedure (or function) should do rather than how it should do it.
I’ve made it immutable, and all the functions (except len which returns a number) return new instances of Vec rather than changing its data in place.
class Vec {
  constructor(public readonly x: number = 0, public readonly y: number = 0) {}
  add = (b:Vec) => new Vec(this.x + b.x, this.y + b.y)
  sub = (b:Vec) => this.add(b.scale(-1))
  len = ()=> Math.sqrt(this.x*this.x + this.y*this.y)
  scale = (s:number) => new Vec(this.x*s,this.y*s)
  ortho = ()=> new Vec(this.y,-this.x)
  rotate = (deg:number) =>
            (rad =>(
                (cos,sin,{x,y})=>new Vec(x*cos - y*sin, x*sin + y*cos)
              )(Math.cos(rad), Math.sin(rad), this)
            )(Math.PI * deg / 180)

  static unitVecInDirection = (deg: number) => new Vec(0,-1).rotate(deg)
  static Zero = new Vec();
}
To implement the toroidal topology of space, we’ll need to know the canvas size.
For now, we’ll hard-code it in a constant CanvasSize. Alternately, we could query it from the SVGScalable Vector Graphics - another part of the HTML standard for specifying images declaratively as sets of shapes and paths.
element, or we could set the SVGScalable Vector Graphics - another part of the HTML standard for specifying images declaratively as sets of shapes and paths.
size—maybe later.
The torus wrapping function will use the CanvasSize to determine the bounds and simply teleport any Vec which goes out of bounds to the opposite side.
const
  CanvasSize = 200,
  torusWrap = ({x,y}:Vec) => {
    const wrap = (v:number) =>
      v < 0 ? v + CanvasSize : v > CanvasSize ? v - CanvasSize : v;
    return new Vec(wrap(x),wrap(y))
  };
We’ll use Vec in a slightly richer set of State.
  type State = Readonly<{
    pos:Vec,
    vel:Vec,
    acc:Vec,
    angle:number,
    rotation:number,
    torque:number
  }>
We create an initialState using CanvasSize to start the spaceship at the centre:
  const initialState:State = {
      pos: new Vec(CanvasSize/2,CanvasSize/2),
      vel: Vec.Zero,
      acc: Vec.Zero,
      angle:0,
      rotation:0,
      torque:0
  }
Reducing State
Now we are ready to define the actions that are triggered by the key events. Each action modifies state in some way. Let’s define a common type for actions with a single pure method that takes a previous state, and returns a new state after applying the action.
interface Action {
  apply(s: State): State;
}
Now we define a class implementing Action for each of Tick, Rotate, and Thrust:
class Tick implements Action {
  constructor(public readonly elapsed:number) {}
  apply(s:State):State {
    return {...s,
      rotation: s.rotation+s.torque,
      angle: s.angle+s.rotation,
      pos: torusWrap(s.pos.add(s.vel)),
      vel: s.vel.add(s.acc)
    }
  }
}
class Rotate implements Action {
  constructor(public readonly direction:number) {}
  apply(s:State):State {
    return {...s,
      torque: this.direction
    }
  }
}
class Thrust implements Action {
  constructor(public readonly on:boolean) {}
  apply(s:State):State {
      return {...s,
        acc: this.on ? Vec.unitVecInDirection(s.angle).scale(0.05)
                 : Vec.Zero
      }
  }
}
And now our function to reduce state is very simple, taking advantage of subtype polymorphism to apply the correct update to State:
reduceState = (s: State, action: Action) => action.apply(s);
And finally we merge our different inputs and scan over State, and the final subscribe calls the updateView, once again, a self-contained function which does whatever is required to render the State. We describe the updated updateView in the next section.
  merge(
    interval(10).pipe(map(elapsed=>new Tick(elapsed))),
    startLeftRotate, startRightRotate, stopLeftRotate, stopRightRotate,
    startThrust, stopThrust,
  )
    .pipe(scan(reduceState, initialState))
    .subscribe(updateView);
View
Once again, the above completely decouples the view from state management. But now we have a richer state, we have more stuff we can show in the view. We’ll start with a little CSSCascading Style Sheets - another declarative (part of the HTML5 standard) for specifying reusable styles for web page rendering. , not only to style elements, but also to hide or show flame from our boosters.
.ship {
  fill: lightblue;
}
.booster {
  fill: orange;
}
.hidden {
  visibility:hidden;
}
We add a few more polygons for the booster flames:
<script src="/bundle.js"></script>
<svg id="svgCanvas" width="200" height="200" style="background-color:black">
  <g id="ship" transform="translate(100,100)">
    <polygon class="booster hidden" id="forwardThrust" points="-3,20 0,35 3,20">
    </polygon>
    <polygon class="booster hidden" id="leftThrust" points="2,-10 15,-12 2,-14">
    </polygon>
    <polygon class="booster hidden" id="rightThrust" points="-2,-10 -15,-12 -2,-14">
    </polygon>
    <polygon class="ship" points="-15,20 15,20 0,-20">
    </polygon>
  </g>
</svg>
And here’s our updated updateView function where we not only move the ship but also show flames shooting out of it as it powers around the torus:
  function updateView(s: State) {
    const
      ship = document.getElementById("ship")!,
      show = (id:string,condition:boolean)=>((e:HTMLElement) =>
        condition ? e.classList.remove('hidden')
                  : e.classList.add('hidden'))(document.getElementById(id)!);
    show("leftThrust",  s.torque<0);
    show("rightThrust", s.torque>0);
    show("forwardThrust",    s.acc.len()>0);
    ship.setAttribute('transform', `translate(${s.pos.x},${s.pos.y}) rotate(${s.angle})`);
  }
Additional Objects
Things get more complicated when we start adding more objects to the canvas that all participate in the physics simulation. Furthermore, objects like asteroids and bullets will need to be added and removed from the canvas dynamically—unlike the ship whose visual is currently defined in the svg and never leaves.
However, we now have all the pieces of our MVC architecture in place, all tied together with an observableA data structure that represents a collection of future values or events, allowing for asynchronous data handling and reactive programming. stream:
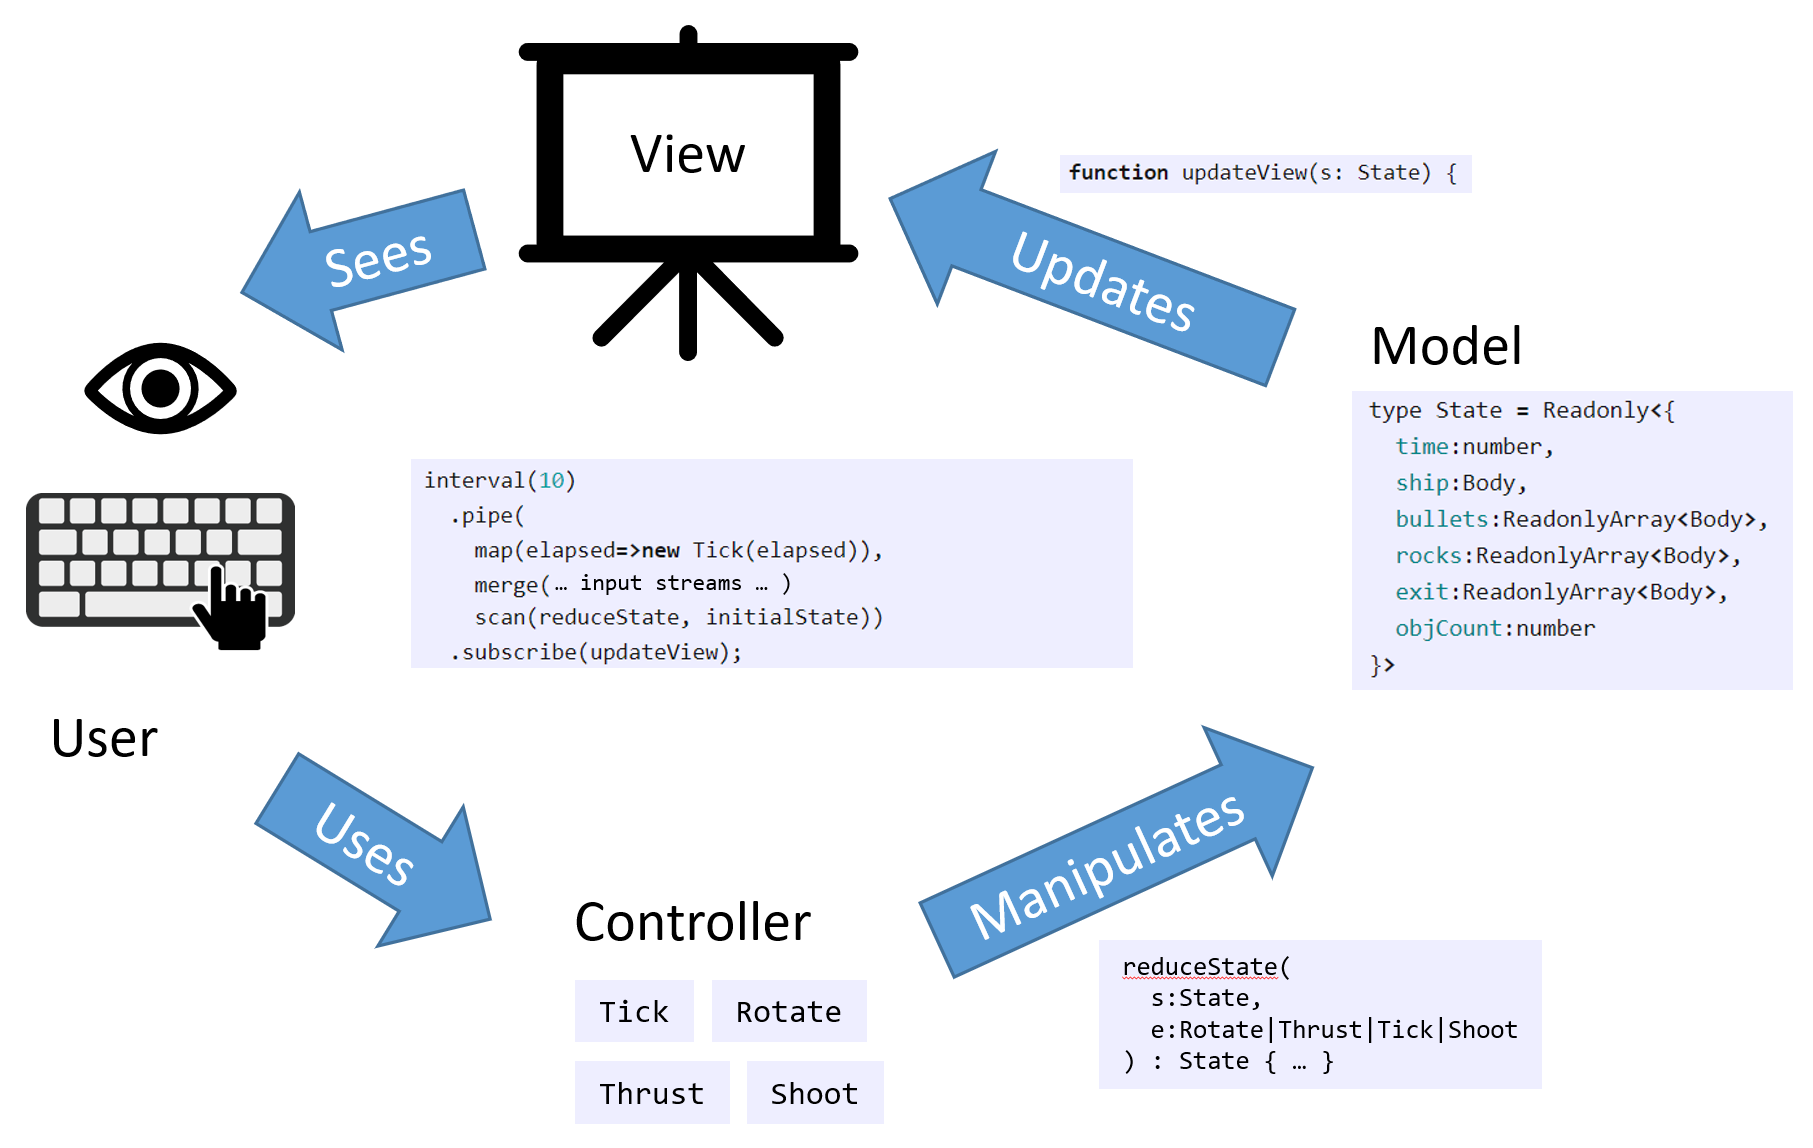
So completing the game is just a matter of:
- adding more input actions (e.g.
Shoot) - extending our state data structure to include bullets, rocks, etc.
- extending our reduce state function to manipulate this State
- extending the
updateViewfunction so the user can see it
We’ll start with bullets that can be fired with the Space key, and which expire after a set period of time:
Per-object State
The first complication is generalising bodies that participate in the force model with their own type Body, separate from the State:
  type Body = Readonly<{
    id:string,
    pos:Vec,
    vel:Vec,
    thrust:boolean,
    angle:number,
    rotation:number,
    torque:number,
    radius:number,
    createTime:number
  }>
  type State = Readonly<{
    time:number,
    ship:Body,
    bullets:ReadonlyArray<Body>,
    exit:ReadonlyArray<Body>,
    objCount:number
  }>
So the ship is a Body, and we will have collections of Body for both bullets and rocks. What’s this exit thing? Well, when we remove something from the canvas, e.g. a bullet, we’ll create a new state with a copy of the bullets array minus the removed bullet, and we’ll add that removed bullet—together with any other removed Bodys—to the exit array. This notifies the updateView function that they can be removed.
Note the objCount. This counter is incremented every time we add a Body and gives us a way to create a unique id that can be used to match the Body against its corresponding view object.
Now we define functions to create objects:
  function createBullet(s:State):Body {
    const d = Vec.unitVecInDirection(s.ship.angle);
    return {
      id: `bullet${s.objCount}`,
      pos:s.ship.pos.add(d.scale(s.ship.radius)),
      vel:s.ship.vel.add(d.scale(2)),
      createTime:s.time,
      thrust:false,
      angle:0,
      rotation:0,
      torque:0,
      radius:3
    }
  }
  function createShip():Body {
    return {
      id: 'ship',
      pos: new Vec(CanvasSize/2,CanvasSize/2),
      vel: Vec.Zero,
      thrust:false,
      angle:0,
      rotation:0,
      torque:0,
      radius:20,
      createTime:0
    }
  }
  const initialState:State = {
    time:0,
    ship: createShip(),
    bullets: [],
    exit: [],
    objCount: 0
  }
Shoot Action
We’ll add a new action type and observableA data structure that represents a collection of future values or events, allowing for asynchronous data handling and reactive programming. for shooting with the space bar:
class Shoot implements Action {
    /**
     * a new bullet is created and added to the bullets array
     * @param s State
     * @returns new State
     */
    apply = (s: State) => ({ ...s,
      bullets: s.bullets.concat([createBullet(s)]),
      objCount: s.objCount + 1
    })
}
const shoot = keyObservable('keydown','Space', ()=>new Shoot())
And now a function to move objects, same logic as before but now applicable to any Body:
  const moveObj = (o:Body) => <Body>{
    ...o,
    rotation: o.rotation + o.torque,
    angle:o.angle+o.rotation,
    pos:torusWrap(o.pos.sub(o.vel)),
    vel:o.thrust?o.vel.sub(Vec.unitVecInDirection(o.angle).scale(0.05)):o.vel
  }
And our Tick action is a little more complicated now:
class Tick implements Action {
  constructor(public readonly elapsed:number) {}
  apply(s:State):State {
    const not = <T>(f:(x:T)=>boolean)=>(x:T)=>!f(x),
      expired = (b:Body)=>(this.elapsed - b.createTime) > 100,
      expiredBullets:Body[] = s.bullets.filter(expired),
      activeBullets = s.bullets.filter(not(expired));
    return <State>{...s,
      ship:moveObj(s.ship),
      bullets:activeBullets.map(moveObj),
      exit:expiredBullets,
      time:this.elapsed
    }
  }
}
Note that bullets have a lifetime (presumably they are energy balls that fizzle into space after a certain time). When a bullet expires it is sent to exit.
We merge the Shoot stream in as before:
  merge(
...
    shoot,
...
  )
And we tack a bit onto updateView to draw and remove bullets:
  function updateView(s: State) {
...
    const svg = document.getElementById("svgCanvas")!;
    s.bullets.forEach(b=>{
      const createBulletView = ()=>{
        const v = document.createElementNS(svg.namespaceURI, "ellipse")!;
        v.setAttribute("id",b.id);
        v.classList.add("bullet")
        svg.appendChild(v)
        return v;
      }
      const v = document.getElementById(b.id) || createBulletView();
      v.setAttribute("cx",String(b.pos.x))
      v.setAttribute("cy",String(b.pos.y))
      v.setAttribute("rx", String(b.radius));
      v.setAttribute("ry", String(b.radius));
    })
    s.exit.forEach(o=>{
      const v = document.getElementById(o.id);
      if(v) svg.removeChild(v)
    })
  }
Finally, we make a quick addition to the CSSCascading Style Sheets - another declarative (part of the HTML5 standard) for specifying reusable styles for web page rendering. so that the bullets are a different colour to the background:
.bullet {
  fill: red;
}
Collisions
So far the game we have built allows you to hoon around in a spaceship blasting the void with fireballs which is kind of fun, but not very challenging. The Asteroids game doesn’t really become “Asteroids” until you actually have… asteroids. Also, you should be able to break them up with your blaster and crashing into them should end the game. Here’s a preview:
Before we go forward, let’s put all the magic numbers that are starting to permeate our code in one, immutable place:
  const
    Constants = {
      CanvasSize: 600,
      BulletExpirationTime: 1000,
      BulletRadius: 3,
      BulletVelocity: 2,
      StartRockRadius: 30,
      StartRocksCount: 5,
      RotationAcc: 0.1,
      ThrustAcc: 0.1,
      StartTime: 0
    } as const
Initial State
We will need to store two new pieces of state: the collection of asteroids (rocks) which is another array of Body, just like bullets; and also a boolean that will become true when the game ends due to collision between the ship and a rock.
  type State = Readonly<{
    ...
    rocks:ReadonlyArray<Body>,
    gameOver:boolean
  }>
Since bullets and rocks are both just circular Bodys with constant velocity, we can generalise what was previously the createBullet function to create either:
  type ViewType = 'ship' | 'rock' | 'bullet'
  const createCircle = (viewType: ViewType)=> (oid:number)=> (time:number)=> (radius:number)=> (pos:Vec)=> (vel:Vec)=>
    <Body>{
      createTime: time,
      pos:pos,
      vel:vel,
      thrust: false,
      angle:0, rotation:0, torque:0,
      radius: radius,
      id: viewType+oid,
      viewType: viewType
    };
Our initial state is going to include several rocks drifting in random directions, as follows:
  const
    startRocks = [...Array(Constants.StartRocksCount)]
      .map((_,i)=>createCircle("rock")(i)
         (Constants.StartTime)(Constants.StartRockRadius)(Vec.Zero)
         (new Vec(0.5 - Math.random(), 0.5 - Math.random()))),
    initialState:State = {
      time:0,
      ship: createShip(),
      bullets: [],
      rocks: startRocks,
      exit: [],
      objCount: Constants.StartRocksCount,
      gameOver: false
    }
Reducing State
Our tick function is more or less the same as above, but it will apply one more transformation to the state that it returns, by applying the following function. This function checks for collisions between the ship and rocks, and also between bullets and rocks.
    // check a State for collisions:
    //   bullets destroy rocks spawning smaller ones
    //   ship colliding with rock ends game
    const handleCollisions = (s:State) => {
      const
        // Some array utility functions
        not = <T>(f:(x:T)=>boolean)=>(x:T)=>!f(x),
        mergeMap = <T, U>(
          a: ReadonlyArray<T>,
          f: (a: T) => ReadonlyArray<U>
        ) => Array.prototype.concat(...a.map(f)),

        bodiesCollided = ([a,b]:[Body,Body]) => a.pos.sub(b.pos).len() < a.radius + b.radius,
        shipCollided = s.rocks.filter(r=>bodiesCollided([s.ship,r])).length > 0,
        allBulletsAndRocks = mergeMap(s.bullets, b=> s.rocks.map(r=>([b,r]))),
        collidedBulletsAndRocks = allBulletsAndRocks.filter(bodiesCollided),
        collidedBullets = collidedBulletsAndRocks.map(([bullet,_])=>bullet),
        collidedRocks = collidedBulletsAndRocks.map(([_,rock])=>rock),

        // spawn two children for each collided rock above a certain size
        child = (r:Body,dir:number)=>({
          radius: r.radius/2,
          pos:r.pos,
          vel:r.vel.ortho().scale(dir)
        }),
        spawnChildren = (r:Body)=>
                              r.radius >= Constants.StartRockRadius/4
                              ? [child(r,1), child(r,-1)] : [],
        newRocks = mergeMap(collidedRocks, spawnChildren)
          .map((r,i)=>createCircle('rock')(s.objCount + i)(s.time)(r.radius)(r.pos)(r.vel)),

        // search for a body by id in an array
        elem = (a:ReadonlyArray<Body>) => (e:Body) => a.findIndex(b=>b.id === e.id) >= 0,
        // array a except anything in b
        except = (a:ReadonlyArray<Body>) => (b:Body[]) => a.filter(not(elem(b)))

      return <State>{
        ...s,
        bullets: except(s.bullets)(collidedBullets),
        rocks: except(s.rocks)(collidedRocks).concat(newRocks),
        exit: s.exit.concat(collidedBullets,collidedRocks),
        objCount: s.objCount + newRocks.length,
        gameOver: shipCollided
      }
    },
Final View
Finally, we need to update the updateView function. Again, the view update is the one place in our program where we allow imperativeImperative programs are a sequence of statements that change a program’s state. This is probably the dominant paradigm for programming languages today. Languages from Assembly to Python are built around this concept and most modern languages still allow you to program in this style.
style, effectful code. Called only from the subscribe at the very end of our ObservableA data structure that represents a collection of future values or events, allowing for asynchronous data handling and reactive programming.
chain and not mutating any state that is read anywhere else in the ObservableA data structure that represents a collection of future values or events, allowing for asynchronous data handling and reactive programming.
, we ensure that it is not the source of any but the simplest display bugs, which we can hopefully diagnose with local inspection of this one function.
First, we need to update the visuals for each of the rocks, but these are the same as bullets. The second, slightly bigger, change is simply to display the text “Game Over” on s.gameover true.
  function updateView(s: State) {
  ...
    s.bullets.forEach(updateBodyView);
    s.rocks.forEach(updateBodyView);
    s.exit.forEach(o=>{
      const v = document.getElementById(o.id);
      if(v) svg.removeChild(v);
    })
    if(s.gameOver) {
      subscription.unsubscribe();
      const v = document.createElementNS(svg.namespaceURI, "text")!;
      attr(v,{
        x: Constants.CanvasSize/6,
        y: Constants.CanvasSize/2,
        class: "gameover"
      });
      v.textContent = "Game Over";
      svg.appendChild(v);
    }
  }
where we’ve created a little helper function attr to bulk set properties on an Element:
  const
    attr = (e:Element, o:{ [key:string]: Object }) =>
      { for(const k in o) e.setAttribute(k,String(o[k])) },
Note that we need to specify the types of values inside o, otherwise, we will get an implicit any error.
The other thing happening at game over, is the call to subscription.unsubscribe. This subscription is the object returned by the subscribe call on our main ObservableA data structure that represents a collection of future values or events, allowing for asynchronous data handling and reactive programming.
:
  const subscription = merge(
    interval(10).pipe(map(elapsed=>new Tick(elapsed))),
    startLeftRotate, startRightRotate, stopLeftRotate, stopRightRotate,
    startThrust, stopThrust,
    shoot
  )
    .pipe(scan(reduceState, initialState))
    .subscribe(updateView);
Key ingredients of a game in FRP style
This section here is key to FRP, with four key ingredients:
- A constant rate interval tick, to ensure consistent frame rate
- Merged with Inputs from the user
- Scan to update the state of the game
- Impure updates based on game state in subscribe
Any other game in FRP style, will likely involve an almost identical skeleton of:
  const subscription = merge(
    interval(FRAME_RATE).pipe(map(elapsed=>new Tick(elapsed))),
    USER_INPUT_STREAMS
  )
    .pipe(scan(reduceState, INITIAL_GAME_STATE))
    .subscribe(updateView);
The job of the programmer (e.g., you in Assignment 1) will be to create appropriate functions to handle modification of the state, view, and inputs to ensure correct behaviour of the chosen game.
Finally, we need to make a couple more additions to the CSSCascading Style Sheets - another declarative (part of the HTML5 standard) for specifying reusable styles for web page rendering. to display the rocks and game over text:
.rock {
  fill: burlywood;
}
.gameover {
  font-family: sans-serif;
  font-size: 80px;
  fill: red;
}
At this point we have more or less all the elements of a game. The implementation above could be extended quite a lot. For example, we could add score, ability to restart the game, multiple lives, perhaps some more physics. But generally, these are just extensions to the framework above: manipulation and then display of additional state.
The key thing is that the observableA data structure that represents a collection of future values or events, allowing for asynchronous data handling and reactive programming. has allowed us to keep well separated state management (model), its input and manipulation (control) and the visuals (view). Further extensions are just additions within each of these elements—and doing so should not add greatly to the complexity.
I invite you to click through on the animations above, to the live code editor where you can extend or refine the framework I’ve started.